
- Tire Products
- ATV車胎
-
Mud / Sand
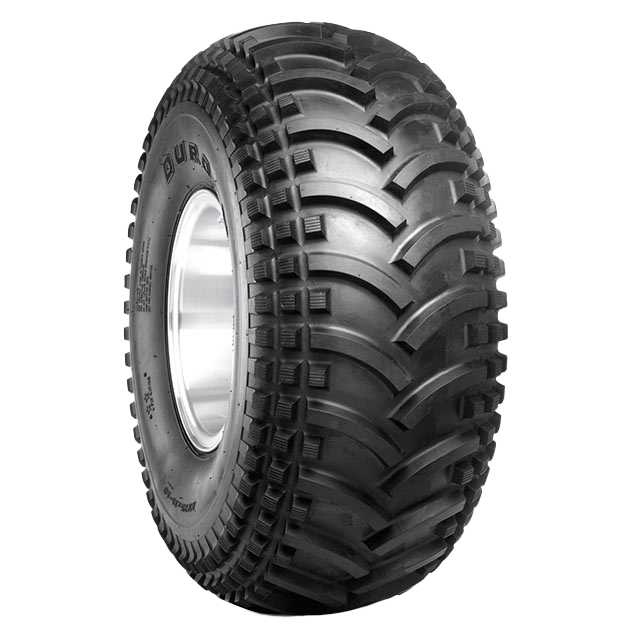
MUD AND SAND
- 獨特的花紋設計搭配強化的胎體結構,提升車輛在各種崎嶇或鋪裝路面的牽引力和耐久性能。
- 連續且密集的花紋塊排列,可提供行駛鋪設路面的操控穩定性與舒適性。
- 花紋溝底不規則狀的粗糙表面設計,能使泥沙不易附著。
- 花紋塊的齒狀溝槽設計能破除水膜,可有效地嵌入泥濘地以增加在泥濘、濕地的牽引力。
- 榮獲KAWASAKI指定OE機種使用(如Mule系列),並獲得2018德國紅點設計獎與2019台灣精品獎肯定。
Asymmetric Design

City

Dry

Highway

Mountain

Noise Reduction

Performance

Wet
Specifications
直徑 8 (inch)+
Tire Size |
Diameter (inch) |
Aspect Ratio |
Speed/Load Index |
Layer |
Outer Diameter (mm) |
Section Width (mm) |
Tire Pressure (kPa) |
Tire Pressure (PSI) |
Load (KG) |
Load (lbs) |
Rim (inch) |
Tread Depth (mm) |
E-Mark |
|---|---|---|---|---|---|---|---|---|---|---|---|---|---|
| AT21x12-8 | 8 | - | - | 2/(☆) | 550 | 247 | 25 | 4 | 128 | 280 | 8_5 | 14_5 | - |
| AT21x12-8 | 8 | - | - | 4/(☆☆) | 550 | 247 | 35 | 5 | 160 | 355 | 8_5 | 14_5 | - |
| AT22x11-8 | 8 | - | - | 2/(☆) | 550 | 247 | 25 | 4 | 125 | 275 | 8_5 | 14_5 | - |
| AT22x11-8 | 8 | - | - | 4/(☆☆) | 550 | 247 | 35 | 5 | 155 | 340 | 8_5 | 14_5 | - |
直徑 9 (inch)+
Tire Size |
Diameter (inch) |
Aspect Ratio |
Speed/Load Index |
Layer |
Outer Diameter (mm) |
Section Width (mm) |
Tire Pressure (kPa) |
Tire Pressure (PSI) |
Load (KG) |
Load (lbs) |
Rim (inch) |
Tread Depth (mm) |
E-Mark |
|---|---|---|---|---|---|---|---|---|---|---|---|---|---|
| AT20x10-9 | 9 | - | - | 4/(☆☆) | 508 | 250 | 35 | 5 | 118 | 260 | 8_0 | 15_0 | - |
| AT22x11-9 | 9 | - | - | 2/(☆) | 550 | 270(281) | 35 | 5 | 125 | 275 | 9_0 | 14_5 | - |
| AT22x11-9 | 9 | - | - | 4/(☆☆) | 563 | 272(281) | 35 | 5 | 155 | 340 | 9_0 | 14_5 | - |
| AT25x12-9 | 9 | - | - | 2/(☆) | 630 | 264 | 25 | 4 | 160 | 355 | 9_5 | 14_5 | - |
| AT25x12-9 | 9 | - | - | 4/(☆☆) | 630 | 264 | 35 | 5 | 195 | 430 | 9_5 | 14_5 | - |
| AT25x12-9 | 9 | - | - | 6(☆☆☆) | 625 | 264 | 45 | 7 | 224 | 495 | 9_5 | 14_5 | - |
直徑 10 (inch)+
Tire Size |
Diameter (inch) |
Aspect Ratio |
Speed/Load Index |
Layer |
Outer Diameter (mm) |
Section Width (mm) |
Tire Pressure (kPa) |
Tire Pressure (PSI) |
Load (KG) |
Load (lbs) |
Rim (inch) |
Tread Depth (mm) |
E-Mark |
|---|---|---|---|---|---|---|---|---|---|---|---|---|---|
| AT22x11-10 | 10 | - | - | 2/(☆) | 560 | 268 | 25 | 4 | 121 | 265 | 9_0 | 15_0 | - |
| AT22x11-10 | 10 | - | - | 4/(☆☆) | 560 | 268 | 35 | 5 | 150 | 330 | 9_0 | 15_0 | - |
| AT22x11-10 | 10 | - | - | 6/(☆☆☆) | 560 | 268 | 100 | 15 | 175 | 385 | 9_0 | 15_0 | - |
| AT24x11-10 | 10 | - | - | 2/(☆) | 600(579) | 255(268) | 25 | 4 | 140 | 310 | 9_0 | 14_5 | - |
| AT24x11-10 | 10 | - | - | 4/(☆☆) | 600 | 255 | 35 | 5 | 175 | 385 | 9_0 | 14_5 | - |
| AT25x11-10 | 10 | - | - | 4/(☆☆) | 636 | 283 | 35 | 5 | 180 | 395 | 9_0 | 15_0 | - |
| AT25x12-10 | 10 | - | - | 2/(☆) | 640 | 270 | 25 | 4 | 160 | 355 | 9_5 | 14_5 | - |
| AT25x12-10 | 10 | - | - | 4/(☆☆) | 640 | 270(281) | 35 | 5 | 195 | 430 | 9_5 | 14_5 | - |
直徑 11 (inch)+
Tire Size |
Diameter (inch) |
Aspect Ratio |
Speed/Load Index |
Layer |
Outer Diameter (mm) |
Section Width (mm) |
Tire Pressure (kPa) |
Tire Pressure (PSI) |
Load (KG) |
Load (lbs) |
Rim (inch) |
Tread Depth (mm) |
E-Mark |
|---|---|---|---|---|---|---|---|---|---|---|---|---|---|
| AT23x8-11 | 11 | - | - | 2/(☆) | 563(584) | 199 | 25 | 3_5 | 95 | 210 | 6_5 | 10_5 | - |
| AT23x8-11 | 11 | - | - | 4/(☆☆) | 563(584) | 199 | 35 | 5 | 115 | 255 | 6_5 | 10_5 | - |
| AT24x9-11 | 11 | - | - | 2/(☆) | 625 | 205 | 35 | 5 | 115 | 255 | 7_0 | 14_5 | - |
| AT24x9-11 | 11 | - | - | 4/(☆☆) | 625 | 205 | 35 | 5 | 140 | 310 | 7_0 | 14_5 | - |
直徑 12 (inch)+
Tire Size |
Diameter (inch) |
Aspect Ratio |
Speed/Load Index |
Layer |
Outer Diameter (mm) |
Section Width (mm) |
Tire Pressure (kPa) |
Tire Pressure (PSI) |
Load (KG) |
Load (lbs) |
Rim (inch) |
Tread Depth (mm) |
E-Mark |
|---|---|---|---|---|---|---|---|---|---|---|---|---|---|
| AT25x8-12 | 12 | - | - | 2/(☆) | 640 | 199 | 25 | 4 | 109 | 240 | 6_5 | 14_5 | - |
| AT25x8-12 | 12 | - | - | 4/(☆☆) | 640 | 199 | 35 | 5 | 132 | 290 | 6_5 | 14_5 | 38N |
| AT25x9-12 | 12 | - | - | 2/(☆) | 645 | 209 | 25 | 4 | 109 | 240 | 8_0 | 14_5 | - |
| AT25x9-12 | 12 | - | - | 4/(☆☆) | 645 | 209 | 35 | 5 | 132 | 290 | 8_0 | 14_5 | - |
| AT25x10-12 | 12 | - | - | 2/(☆) | 635 | 255 | 25 | 3_5 | 132 | 290 | 8_0 | 14_5 | - |
| AT25x10-12 | 12 | - | - | 4/(☆☆) | 635 | 255 | 35 | 5 | 165 | 365 | 8_0 | 14_5 | 45N |